Using quick parts in M365 and Word

Your average end-user does not like to have to repeat themselves, so asking them to fill in a word-template and afterwards asking for the same values to be filled in as metadata will upset them. This is where we look at how we can help users saving time and limiting annoyances. While there are several means to an end, in this post we will focus on the use of Quick Parts in Office 365 and Word.

Setting the stage

We are going to take the classic example of having multiple sites and site collections where people would like to save meeting notes (I know, we could also use OneNote… but just follow for the exercise’s sake 😊).

Often several teams create their own solutions to manage keeping meeting notes. The biggest problem is that we are missing consistency when comparing across sites, missing similar metadata, missing a word template, missing approval flows.

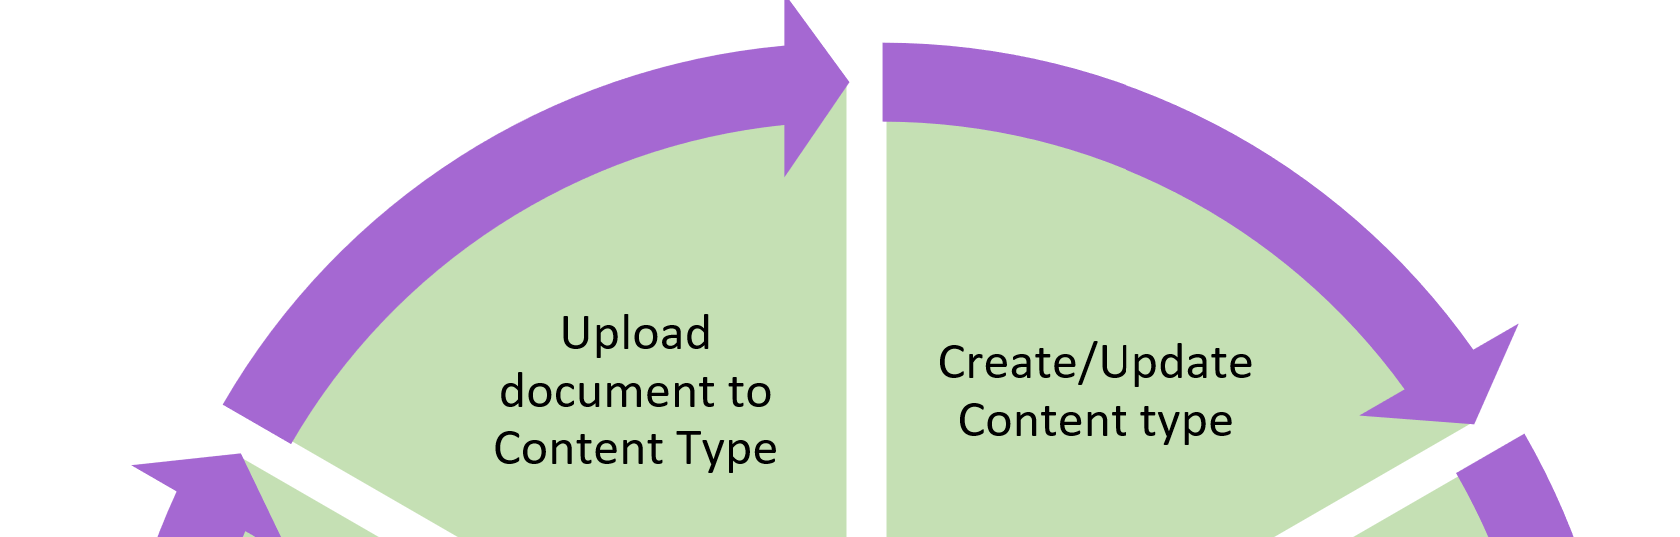
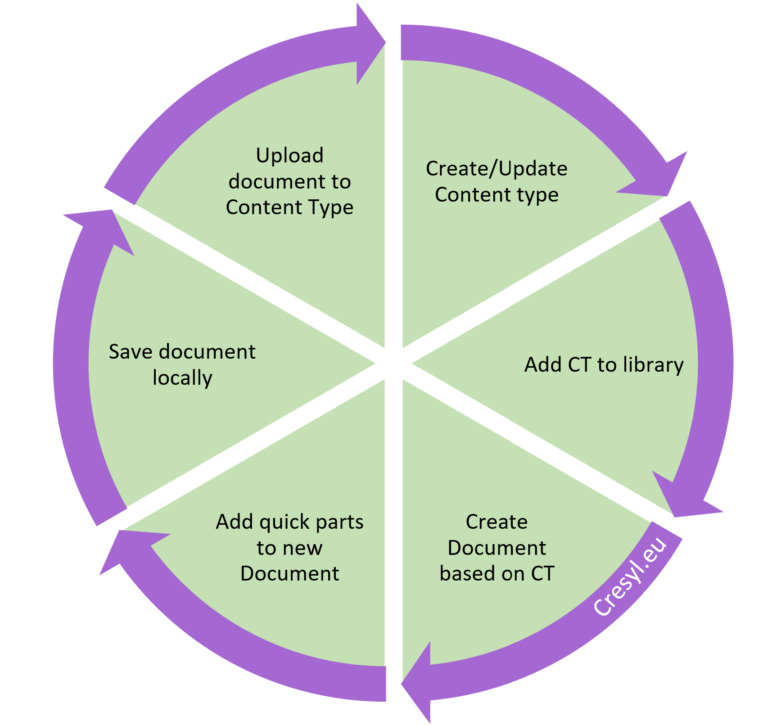
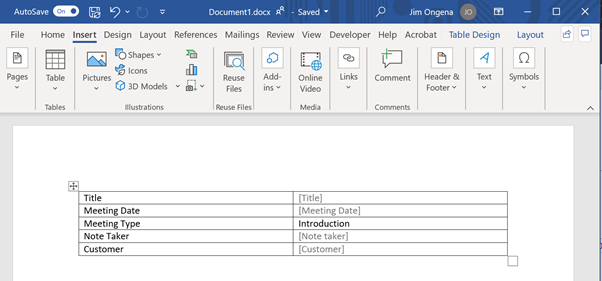
Luckily, we can use the power of Content Types to solve most issues here. Using Content types, we can now create a solution on Tenant-level (or Farm-level if you are still on-prem). We are creating a content type with following fields:

    • Meeting Date (Date/time)
    • Meeting Type (Choice)
    • Note taker (people picker)
    • Customer (Managed Metadata)

Using quick parts

Now that we created our content type, the next step is to add the content type to a library. If you’re new to this, check out the steps the perform this here.

Steps needed to implement Quick Parts enabled templates

Next, we create a document based on the newly added content type and insert the metadata fields within the open  document using the quick parts option. You will find this in the Insert Ribbon under the Text Group.

Using quick parts to enrich word documents

In the example I created, I added a table to allow for clean alignment and to be able to add a label in front of the quick parts. You will notice that the ‘Meeting Type’ is already filled in, which is due to it having a default value.

Creating a simple table to contain the SP-connected web parts

Save the newly created document locally (you could save it to SharePoint, but that will bring some unexpected issues). Make sure that you do not fill in any of the other Quick parts before you save the file.


The last preparation step is to upload the file to our content type. So, go back to ‘site content types’ in your site or content type hub. Navigate to your content type and select the ‘Advanced Settings’. Here you will find two options:

  • Enter the URL of an existing document template
  • Upload a new document template
Adding your template as default to the content type

Select the second option (read the focus box to know why you would better not select the first one).

Then, upload your local file and save the settings.

From this point onwards, you will be able to create a new document based on the content type, and immediately having the right template with quick parts. If you need to perform any updates to your template, just perform steps 4-6 again.

Although the use of quick parts can provide you with an easy solution to embed metadata in documents, there are some limitations.

  • Only works for Word, not for Excel or PowerPoint
  • Does not work in Word online for changes and modifications
  • If you add a template using the URL instead of the upload, the connection with the metadata is lost, 

Using the option “Enter the URL of an existing document template”

In many organizations, document templates are managed by the communications department. It would make sense that those people can directly manage and push their changes to the whole organization, without having to go through the whole update process. 

You can achieve this by using the option “Enter the URL of an existing document template”. While you can use this solution to provide the means for the communications team, you cannot use it in combination with quick parts. Ever since this option was introduced, it always has been breaking the connection between the content type metadata and the quick parts.

So in brief, if you want to give power to the communication department to manage the templates, you’ll have to give up on the advantages of embedding quick parts.

Share on facebook
Facebook
Share on twitter
Twitter
Share on linkedin
LinkedIn

How to manage Hub navigation security trimming

When you setup sites in a larger organization, you’re probably going to investigate Hub Sites to manage the site structure. The configuration of Hub Sites allows you to create a general navigation structure that automatically is pushed to all sites linked to the Hub site, hence assuring consistency, and limiting the amount of management to do.

While the general setup is straightforward, you may encounter exceptions where Hub navigation shouldn’t be pushed through.

Let’s take for example a Project Hub to group larger projects. In this case it would be advantageous that users who have no access to the other sites, would not see them. What are the best ways to handle this?

Option 1: plain old default settings

Yups, the first one is the easiest one; just working with the default options for Hub navigation. In this case you add links and headers to your Hub navigation, not considering permissions to the related sites.

Default Hub navigation Link Item

The biggest drawback here is that the navigation is not security trimmed, hence you’ll see items which you’re not allowed to see. Luckily the user will get an access denied when they click on one of the oof-limits items.

What happens in the background is that the hub navigation is stored in a hidden list, both in the Hub site, and a copy in each connected site in a hidden ‘/_catalogs/hubsite’ list. The structure is e.g.

{"headerEmphasis":null,"themeKey":null,"name":"Projects Hub","url":"https://tenant.sharepoint.com/sites/ProjectsHub","logoUrl":null,"logoFileHash":0,"usesMetadataNavigation":false,"megaMenuEnabled":false,"navigation":[{"Id":2006,"Title":"Project 1","Url":"https://tenant.sharepoint.com/sites/Project1","IsDocLib":false,"IsExternal":false,"ParentId":1002,"ListTemplateType":0,"AudienceIds":null,"CurrentLCID":1033,"Children":[]},{"Id":2007,"Title":"Project 2","Url":"https://tenant.sharepoint.com/sites/Project2","IsDocLib":false,"IsExternal":false,"ParentId":1002,"ListTemplateType":0,"AudienceIds":null,"CurrentLCID":1033,"Children":[]}],"isNavAudienceTargeted":false,"siteDesignId":"00000000-0000-0000-0000-000000000000","requiresJoinApproval":false,"hideNameInNavigation":false,"parentHubSiteId":"00000000-0000-0000-0000-000000000000","relatedHubSiteIds":null}

Option 2: Hub configuration – Audience targeting

Luckily Microsoft extended the navigation with an option to add audience targeting to navigation items. You first need to enable this by editing the Hub navigation and then enable the option at the bottom of the hub navigation pane.

When you now create or update a navigation item, you will notice that an option ‘Audiences to target’ has been added.

20210217-hubnavigationnewlinkwithaudiencetargeting

This option does give us a way to limit access to a navigation item, but if you’re having a large navigation to manage, and all items need to be restricted … it will take you some time and follow-up.

The moment you add an audience to a navigation item, an icon will be added in the overview to indicate this.

In the background the hiddenlist is updated to reflect this change by adding an audienceID and by setting isNavAudienceTargeted to ‘true’.

{"headerEmphasis":null,"themeKey":null,"name":"Projects Hub","url":"https://tenant.sharepoint.com/sites/ProjectsHub","logoUrl":null,"logoFileHash":0,"usesMetadataNavigation":false,"megaMenuEnabled":false,"navigation":[{"Id":2006,"Title":"Project 1","Url":"https://tenant.sharepoint.com/sites/Project1","IsDocLib":false,"IsExternal":false,"ParentId":1002,"ListTemplateType":0,"AudienceIds":null,"CurrentLCID":1033,"Children":[]},{"Id":2007,"Title":"Project 2","Url":"https://tenant.sharepoint.com/sites/Project2","IsDocLib":false,"IsExternal":false,"ParentId":1002,"ListTemplateType":0,"AudienceIds":["d20ecec6-2f1b-4dd0-a737-5249b7ac538c"],"CurrentLCID":1033,"Children":[]}],"isNavAudienceTargeted":true,"siteDesignId":"00000000-0000-0000-0000-000000000000","requiresJoinApproval":false,"hideNameInNavigation":false,"parentHubSiteId":"00000000-0000-0000-0000-000000000000","relatedHubSiteIds":null}

Option 3: Results web part on a page

The third option isn’t really a navigation solution, but rather a workaround roll-up to ensure security trimmed information is shown.

To achieve this, we revert to the “Highlighted Content” web part. With some basic settings, it can provide you with a security trimmed list of sites. In our example it’s easy, since each link in the hub navigation refers to a Project site, and each project site has one home page.

Option 4: Development

Since I’m not a developer (and I’m not soon going to become one 😊), I looked at a couple of documented developed implementations, of which two showed some merit.

Conclusion

We saw 4 different ways to create a ‘trimmed’ navigation. And although neither of them gave the perfect answer, each can be used in its specific context.

Hub sites have their merits and their limitations; it is up to the information architect to look at the relationship and interdependencies to go for the correct solution.

Option Security trimming Customizable Easy to setup Easy to maintain
Default Hub Navigation
No
No
Yes
Yes
Hub Navigation with Audience targeting
Yes
No
Yes
No
Highlighted contents
Yes
Limited
Yes
Yes
Default Hub Navigation
Yes
Yes
No
No

Maybe one could argue that it would be better not to use the Hub sites at all, then remember that Microsoft is working hard in bringing new features (such as syntex, site scripting, centralized color schemes) that will require a sound information structure where hub sites will play their part.

Share on facebook
Facebook
Share on twitter
Twitter
Share on linkedin
LinkedIn

Understanding how Share-links are built in SharePoint and OneDrive

I recently got multiple questions from several customers regarding the way the Share-links are being built in SharePoint and OneDrive. Now for the most part it’s easy to explain, but when going through the link, I noticed that things had changed since I looked at this the last time.

Sharing files with people

With Office 365 sharing has become easier than ever before. Both in SharePoint and OneDrive Microsoft is pushing the use of sharing links instead of copying files (which from an information management perspective is the best way to go).

Sharing settings dialog

Now the moment that you shared something, you’ll notice that a special URL is generated, such as:

https://.sharepoint.com/:u:/s/Playground/EaGfaDqQredKm8HIr6LlMQEBJm9f4s0iVsghQDEnEUlLGQ?e=hreQk4

https://.sharepoint.com/:u:/s/Playground/ER36Ag-lsyxOpo6YHV1E-bMBxtauCdbdo-SMHCnrQXqjtQ?e=szirtB

Digging into the URL-structure

The structure of this url isn’t a complete coincidence (or what were you thinking). You’ll notice that within the URL there are specific blocks:

Structure of a sharing link

In this link we can see following components:

A. The first part is the URL of your tenant and is also the already present main site collection URL

B. This part defines the type of document you are sharing.

  • b – pdf-files
  • f – folder
  • o – Onenote file
  • p – powerpoint file
  • t – txt-file
  • u – web page link, audio files, visio, zip, publisher, mail, and all other file types which have no dedicated letter
  • v – video files
  • w – word-document
  • x – excel-file


C. the third part defines the type of sharing which is being used

  • s – the file being shared is only to be read, there is no distinction whether the file can be downloaded or not
  • r – restricted sharing with people which already have access to the file.

D. If the shared file resides in a specific site, the name of that site will be shown here. There is not difference made if the file library is in a site collection top level, or in a subsite

E. A 24-character anonymized reference to the file you want to share. If you shared the item with people who already have access, this is replaced with the path to the file (library/filename).

F. An internal character set to define further details regarding the sharing. If the item was shared to one specific user, the set contains less characters, but an extra parameter ‘email’ is added containing the mail-adress to which is was shared.

E. This parameter section is added by default behind each share-link.

  • d= xxxx – this will help creating a unique URL to allow opening the file in the browser. If you remove this parameter, you’ll get a download request. This parameter is only added when you share with People with existing access.
  • Csf=1 – added when sharing with People with existing access
  • Web=1 – opens the file in the browser
  • E= xxxx – The purpose of this parameter isn’t really known; if you remove it, the Share will work the same way.

The fun part is that in most cases the parameters can be removed from the url, and it will just keep on working 😊.

I hope this post was of value, if you would have any remarks or idea’s, just get in touch.

Share on facebook
Facebook
Share on twitter
Twitter
Share on linkedin
LinkedIn