Power Automate – using the list display name out of an Item Url

A couple of days ago I had to create a flow that would trigger on the current item. As such, nothing special to be noted. The next question was to make this flow available on multiple libraries within the same site.

After searching around I found following options:

  • Copy the flow to each library (and hence afterwards being responsible for updating each flow if something changes)
  • Instant flow and then retrieve the related information (but having to perform queries on the list where I already started from)
  •  Just reuse the exiting flow, where I remembered from one of Laura’s Power Hours that the context of the item will be taken along, even when not triggering from the list where the flow was originally built for

I decided to go for the last option and found this to be such an easy way to make a flow reusable… but of course with some hiccups along the way, especially since some actions require a list ID, and others a List Name.

First step: creating a flow

What we’ll do in our flow is to request a simple approval to a manager, and this based on the document on which the flow is started.

Basic Power Automate approval flow
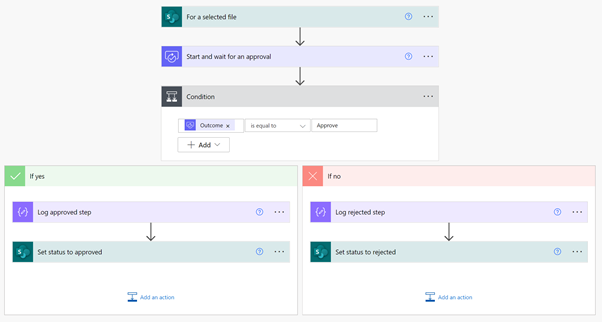
      • What ties this flow together is the trigger “For a selected file”. when using this trigger, the itemUrl for the selected file will become available. The perk is that the itemUrl doesn’t really depend on the configuration of the trigger; even if you start the flow from another library (within the same site).
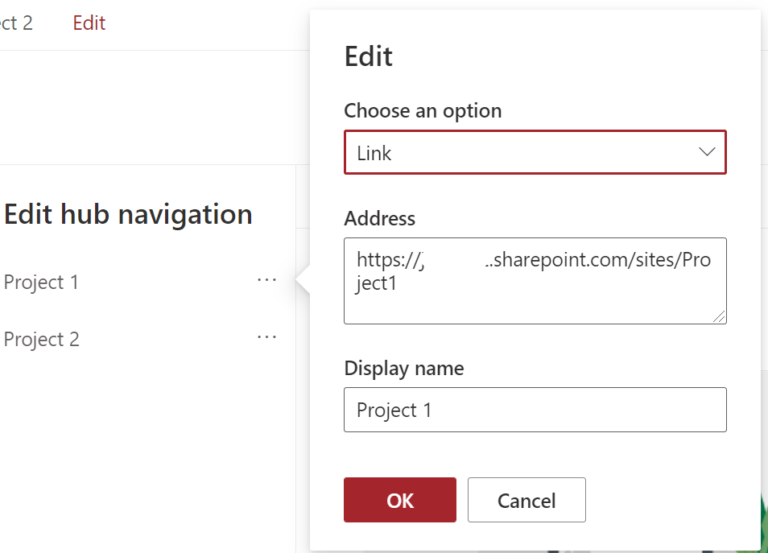
Instead of having to recreate this flow for each library, I’m going to create a button in each library that will trigger the same flow where I just ask for the future approver.

Second step: extending the flow for the future reusability

We’ll need a couple of variables to make everything work:
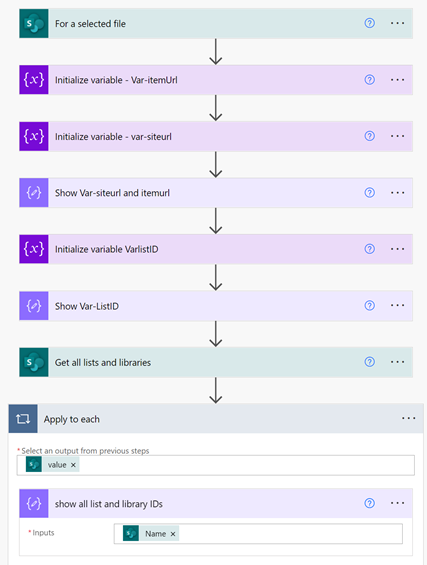
  • Var-itemUrl: to store the item url
  • Var-siteUrl: can be a fixed value, or you can use the formula
    split(variables(‘Var-itemUrl’),’_layouts’)[0]
  • Var-listID: to store the extracted listID
  • Var-ListName: to store the final list name
 

Let’s go through some of the steps:

  • We’re storing the itemurl in the var-itemurl
  • Using that variable, we’re creating the var-listID variable, with following formula: split(split(variables(‘Var-itemUrl’),’%7B’)[3],’%7D’)[0]
  • The last variable to fill, is the ListName. This is done in two steps:
    • First, query the site to get all lists
    • Then map the lists found to the listID we already have

And then you’ll notice you’re not getting the needed result, but just a blank result. The reason for this, is that the listID we retrieved from the itemUrl is in upper case, and the results we got from the ‘Get all lists and libraries’ is in lower case.

Solving the list-ID issue

The first time I went through the flow, assuming that I did everything correct of course, I was getting annoyed by lack of body content, without having any clean indication. It was when starting to compare and to play around that I noticed the discrepancy between the the result from the ItemUrl and the get all lists and libraries.

The solution is pretty easy (once you find the root cause); add a ‘toLower’

toLower(split(split(variables(‘Var-itemUrl’),’%7B’)[3],’%7D’)[0])


Publish and reuse

Now we’ve got this resolved, time to publish the flow. The negative thing here, is that users won’t be able to start the flow from the list actions, so we’re adding a direct link next to each item, by updating a custom column to show a direct link to start the flow, which we realize by adding following JSON:

{"$schema": "https://developer.microsoft.com/json-schemas/sp/v2/column-formatting.schema.json", "elmType": "button","customRowAction": {"action": "executeFlow","actionParams": "{\"id\": \"{ID of your flow}"}"},"attributes": {"class": "ms-fontColor-themePrimary ms-fontColor-themeDarker--hover" },"style": {"border": "none","background-color": "transparent","cursor": "pointer"},"children": [{ "elmType": "span","attributes": {"iconName": "Flow"}, "style": {"padding-right": "6px"}},{"elmType": "span", "txtContent": "Request Approval"}]}


Share on facebook
Facebook
Share on twitter
Twitter
Share on linkedin
LinkedIn

Using quick parts in M365 and Word

Your average end-user does not like to have to repeat themselves, so asking them to fill in a word-template and afterwards asking for the same values to be filled in as metadata will upset them. This is where we look at how we can help users saving time and limiting annoyances. While there are several means to an end, in this post we will focus on the use of Quick Parts in Office 365 and Word.

Setting the stage

We are going to take the classic example of having multiple sites and site collections where people would like to save meeting notes (I know, we could also use OneNote… but just follow for the exercise’s sake 😊).

Often several teams create their own solutions to manage keeping meeting notes. The biggest problem is that we are missing consistency when comparing across sites, missing similar metadata, missing a word template, missing approval flows.

Luckily, we can use the power of Content Types to solve most issues here. Using Content types, we can now create a solution on Tenant-level (or Farm-level if you are still on-prem). We are creating a content type with following fields:

    • Meeting Date (Date/time)
    • Meeting Type (Choice)
    • Note taker (people picker)
    • Customer (Managed Metadata)

Using quick parts

Now that we created our content type, the next step is to add the content type to a library. If you’re new to this, check out the steps the perform this here.

Steps needed to implement Quick Parts enabled templates

Next, we create a document based on the newly added content type and insert the metadata fields within the open  document using the quick parts option. You will find this in the Insert Ribbon under the Text Group.

Using quick parts to enrich word documents

In the example I created, I added a table to allow for clean alignment and to be able to add a label in front of the quick parts. You will notice that the ‘Meeting Type’ is already filled in, which is due to it having a default value.

Creating a simple table to contain the SP-connected web parts

Save the newly created document locally (you could save it to SharePoint, but that will bring some unexpected issues). Make sure that you do not fill in any of the other Quick parts before you save the file.


The last preparation step is to upload the file to our content type. So, go back to ‘site content types’ in your site or content type hub. Navigate to your content type and select the ‘Advanced Settings’. Here you will find two options:

  • Enter the URL of an existing document template
  • Upload a new document template
Adding your template as default to the content type

Select the second option (read the focus box to know why you would better not select the first one).

Then, upload your local file and save the settings.

From this point onwards, you will be able to create a new document based on the content type, and immediately having the right template with quick parts. If you need to perform any updates to your template, just perform steps 4-6 again.

Although the use of quick parts can provide you with an easy solution to embed metadata in documents, there are some limitations.

  • Only works for Word, not for Excel or PowerPoint
  • Does not work in Word online for changes and modifications
  • If you add a template using the URL instead of the upload, the connection with the metadata is lost, 

Using the option “Enter the URL of an existing document template”

In many organizations, document templates are managed by the communications department. It would make sense that those people can directly manage and push their changes to the whole organization, without having to go through the whole update process. 

You can achieve this by using the option “Enter the URL of an existing document template”. While you can use this solution to provide the means for the communications team, you cannot use it in combination with quick parts. Ever since this option was introduced, it always has been breaking the connection between the content type metadata and the quick parts.

So in brief, if you want to give power to the communication department to manage the templates, you’ll have to give up on the advantages of embedding quick parts.

Share on facebook
Facebook
Share on twitter
Twitter
Share on linkedin
LinkedIn

A modern approach on connected web parts in O365

For those among us that had/have the pleasure to work with SharePoint on-prem, you may know that you have the option to use Connected web parts (eg. how it was done in MOSS 2007). The principle is rather simple; find a column that can be used a primary key, connect with it, and it’s done. Now you can filter a second list based on what you selected in the first one.

For quite a while, this simple option was not available in SharePoint online. Currently Connected Web Parts in Office 365 is something you can play with, and which has reached a mature level. In this post we’ll go through the possibilities and limitations of connected web parts, and some business cases where you can use them.

A standard setup

Let’s start with the most basic use for connected web parts in Office 365; where you want to filter a list based on a selection in another list. For this to work we need a source list and a target list. It’s important that both lists contain a column where you can retrieve the same values. In general you’ll achieve this by creating a lookup from the second list into the first list, but it will also work with other field types (although you’ll make it yourself more difficult :)). 

Setting up the Dynamic Filtering

In the following example we’re filtering a user’s list by selecting an alphabetical value

Connected Web Parts Before Filtering
Connected Web Parts After Filtering
Combining multiple connections

After setting up a basic example, let’s see what kind of multiple connections are possible. We’ll look at two typical scenarios:

  • Filtering a list on either of two other lists
This setup could for example happen when you have a list of customers, and you would like users to filter either on the country they are from, or on their initials.
Having two filter sources for one filter target

At this moment it is not possible having two sources pointing to the same target. Since the filtering is defined at the target list, which can only accommodate one configuration, you will have to look to a custom development or a search driven solution.

  • Filtering two lists from one source list

In the second multiple-connections example we will look at filtering two web parts based on one source. Since the connection is made at the receiving end, we can easily create both connections. 

Having one source filtering two targets
Cascading connected web parts

The third possibility with connected web parts is creating a cascade of connected web parts. This allow users to drill down in to their information with a couple of clicks. Examples could be in regards to staff-city-details or customers-locations-invoices.

Cascading 3 lists with two separate filters
Extra: List Properties

Everything we saw up to now was related to actively connecting two lists in order to drill down. In some cases you just want to show more details on a specific item. In that case you can use the List Properties Web Part

The List Properties Web Part isn’t the most sexy one out there, but with a couple of clicks it will already show you what you need.

List Properties Configuration Pane


In the examples given, we only worked with lists, but you can also connect with the file viewer, embed web part and document library web part.

 
Conclusion

The connected web parts in Office 365 allow power users to set up solution pretty easily. You could argue that the same could be achieved using Search Web Parts (which I also like to use), but nothing beats the speed and ease by which lists can be connected. These kind of solutions can only work if you spend time on preparing the required metadata and connections.


Share on facebook
Facebook
Share on twitter
Twitter
Share on linkedin
LinkedIn

How to manage Hub navigation security trimming

When you setup sites in a larger organization, you’re probably going to investigate Hub Sites to manage the site structure. The configuration of Hub Sites allows you to create a general navigation structure that automatically is pushed to all sites linked to the Hub site, hence assuring consistency, and limiting the amount of management to do.

While the general setup is straightforward, you may encounter exceptions where Hub navigation shouldn’t be pushed through.

Let’s take for example a Project Hub to group larger projects. In this case it would be advantageous that users who have no access to the other sites, would not see them. What are the best ways to handle this?

Option 1: plain old default settings

Yups, the first one is the easiest one; just working with the default options for Hub navigation. In this case you add links and headers to your Hub navigation, not considering permissions to the related sites.

Default Hub navigation Link Item

The biggest drawback here is that the navigation is not security trimmed, hence you’ll see items which you’re not allowed to see. Luckily the user will get an access denied when they click on one of the oof-limits items.

What happens in the background is that the hub navigation is stored in a hidden list, both in the Hub site, and a copy in each connected site in a hidden ‘/_catalogs/hubsite’ list. The structure is e.g.

{"headerEmphasis":null,"themeKey":null,"name":"Projects Hub","url":"https://tenant.sharepoint.com/sites/ProjectsHub","logoUrl":null,"logoFileHash":0,"usesMetadataNavigation":false,"megaMenuEnabled":false,"navigation":[{"Id":2006,"Title":"Project 1","Url":"https://tenant.sharepoint.com/sites/Project1","IsDocLib":false,"IsExternal":false,"ParentId":1002,"ListTemplateType":0,"AudienceIds":null,"CurrentLCID":1033,"Children":[]},{"Id":2007,"Title":"Project 2","Url":"https://tenant.sharepoint.com/sites/Project2","IsDocLib":false,"IsExternal":false,"ParentId":1002,"ListTemplateType":0,"AudienceIds":null,"CurrentLCID":1033,"Children":[]}],"isNavAudienceTargeted":false,"siteDesignId":"00000000-0000-0000-0000-000000000000","requiresJoinApproval":false,"hideNameInNavigation":false,"parentHubSiteId":"00000000-0000-0000-0000-000000000000","relatedHubSiteIds":null}

Option 2: Hub configuration – Audience targeting

Luckily Microsoft extended the navigation with an option to add audience targeting to navigation items. You first need to enable this by editing the Hub navigation and then enable the option at the bottom of the hub navigation pane.

When you now create or update a navigation item, you will notice that an option ‘Audiences to target’ has been added.

20210217-hubnavigationnewlinkwithaudiencetargeting

This option does give us a way to limit access to a navigation item, but if you’re having a large navigation to manage, and all items need to be restricted … it will take you some time and follow-up.

The moment you add an audience to a navigation item, an icon will be added in the overview to indicate this.

In the background the hiddenlist is updated to reflect this change by adding an audienceID and by setting isNavAudienceTargeted to ‘true’.

{"headerEmphasis":null,"themeKey":null,"name":"Projects Hub","url":"https://tenant.sharepoint.com/sites/ProjectsHub","logoUrl":null,"logoFileHash":0,"usesMetadataNavigation":false,"megaMenuEnabled":false,"navigation":[{"Id":2006,"Title":"Project 1","Url":"https://tenant.sharepoint.com/sites/Project1","IsDocLib":false,"IsExternal":false,"ParentId":1002,"ListTemplateType":0,"AudienceIds":null,"CurrentLCID":1033,"Children":[]},{"Id":2007,"Title":"Project 2","Url":"https://tenant.sharepoint.com/sites/Project2","IsDocLib":false,"IsExternal":false,"ParentId":1002,"ListTemplateType":0,"AudienceIds":["d20ecec6-2f1b-4dd0-a737-5249b7ac538c"],"CurrentLCID":1033,"Children":[]}],"isNavAudienceTargeted":true,"siteDesignId":"00000000-0000-0000-0000-000000000000","requiresJoinApproval":false,"hideNameInNavigation":false,"parentHubSiteId":"00000000-0000-0000-0000-000000000000","relatedHubSiteIds":null}

Option 3: Results web part on a page

The third option isn’t really a navigation solution, but rather a workaround roll-up to ensure security trimmed information is shown.

To achieve this, we revert to the “Highlighted Content” web part. With some basic settings, it can provide you with a security trimmed list of sites. In our example it’s easy, since each link in the hub navigation refers to a Project site, and each project site has one home page.

Option 4: Development

Since I’m not a developer (and I’m not soon going to become one 😊), I looked at a couple of documented developed implementations, of which two showed some merit.

Conclusion

We saw 4 different ways to create a ‘trimmed’ navigation. And although neither of them gave the perfect answer, each can be used in its specific context.

Hub sites have their merits and their limitations; it is up to the information architect to look at the relationship and interdependencies to go for the correct solution.

Option Security trimming Customizable Easy to setup Easy to maintain
Default Hub Navigation
No
No
Yes
Yes
Hub Navigation with Audience targeting
Yes
No
Yes
No
Highlighted contents
Yes
Limited
Yes
Yes
Default Hub Navigation
Yes
Yes
No
No

Maybe one could argue that it would be better not to use the Hub sites at all, then remember that Microsoft is working hard in bringing new features (such as syntex, site scripting, centralized color schemes) that will require a sound information structure where hub sites will play their part.

Share on facebook
Facebook
Share on twitter
Twitter
Share on linkedin
LinkedIn

Some takeaways after working with the On-Premise data gateway

The past months I’ve been working with the On-Premise data gateway. The use case was as follows:

  • The customer is planning to migrate to O365 soon
  • At the same time, they will redefine where data will be stored
  • But in the meantime, they need to improve the interaction of end-users in one of the processes

We decided that Power Apps would be the easiest/cheapest solution to get a group of end-users in direct contact with their assignments. Since we didn’t want to invest in a full-blown migration yet, the Gateway seemed a good option. The installation is pretty straitforward, just follow the steps after downloading the executable to the on-prem server which will host the gateway..

As in all project, there are always things you must discover during the implementation.

The first hurdle was the fact that we had to break our own governance rules, where we have separated environments in the Power Platform for development, test and production. The culprit: On-Premise data gateways can only be used in the default tenant (well done Microsoft). We lost some time in finding out why we couldn’t connect with our sites, and documentation-wise there isn’t much told on this.

If you’re also in need for Gateways being available in different environment, don’t hesitate to vote on Idea Exchange.

A second hurdle was the lack of visibility due to the fact that you must use the default environment for all gateway connections.

Power Platform Connections List

By default, the naming uses the creator’s address and the connection type. At the moment, this is something you cannot change. But again, if you’d like to see this updated, you can via a vote on Idea Exchange.

A third hurdle was to get to know the limitation on the Gateway when you want to connect with SharePoint on-prem and Power Apps. Things which are easy when working completely in O365, can become an issue here.

  • The gateway is supported for the 6 last versions
  • Only one gateway can be installed on a server to be used generally (but you can add other personal ones for use with Power BI)
  • Documentation is rudimentary, you’ll find more information in for a and blog posts

Was the choice for Data Gateway the best one? We still believe so, but if we had known some of the issues beforehand, we would have changed naming conventions, and the management in general.

Share on facebook
Facebook
Share on twitter
Twitter
Share on linkedin
LinkedIn

Planner and Permissions – a quick decision tree

When people are using Teams, they often are confronted with the way permissions and apps are integrated. In this post I’m specifically going to look at using Planner in combination with Teams.

The default scene

Let’s start easy, the standard approach is where a user is member of an existing Teams and wants to add a Planner Tab. This is easy to do using following steps:

  • Navigate to your Teams
  • Select the +-icon to add a new tab
  • Select the Planner
Selecting Planner
  • Give your Planner a name
planner-teams-namingplannertab
Naming your new Planner Tab
  • Click Save, and your tab is added

You see, so easy to create a new Planner tab. Advantage here is that the newly created Planner automatically inherits permissions from the Teams’ Group.

The scenes where they ask you ‘why doesn’t it work’

And of course you’ll get those calls from users who want to make Plans in the strangest combinations, and who do not want to understand some of the limitations. To make it easier to explain, I’ve drawn up a decision tree:

Conclusion

When users ask you to create them a new Plan, ask the right questions so that you don’t run into problems further down the line.

Share on facebook
Facebook
Share on twitter
Twitter
Share on linkedin
LinkedIn

Understanding how Share-links are built in SharePoint and OneDrive

I recently got multiple questions from several customers regarding the way the Share-links are being built in SharePoint and OneDrive. Now for the most part it’s easy to explain, but when going through the link, I noticed that things had changed since I looked at this the last time.

Sharing files with people

With Office 365 sharing has become easier than ever before. Both in SharePoint and OneDrive Microsoft is pushing the use of sharing links instead of copying files (which from an information management perspective is the best way to go).

Sharing settings dialog

Now the moment that you shared something, you’ll notice that a special URL is generated, such as:

https://.sharepoint.com/:u:/s/Playground/EaGfaDqQredKm8HIr6LlMQEBJm9f4s0iVsghQDEnEUlLGQ?e=hreQk4

https://.sharepoint.com/:u:/s/Playground/ER36Ag-lsyxOpo6YHV1E-bMBxtauCdbdo-SMHCnrQXqjtQ?e=szirtB

Digging into the URL-structure

The structure of this url isn’t a complete coincidence (or what were you thinking). You’ll notice that within the URL there are specific blocks:

Structure of a sharing link

In this link we can see following components:

A. The first part is the URL of your tenant and is also the already present main site collection URL

B. This part defines the type of document you are sharing.

  • b – pdf-files
  • f – folder
  • o – Onenote file
  • p – powerpoint file
  • t – txt-file
  • u – web page link, audio files, visio, zip, publisher, mail, and all other file types which have no dedicated letter
  • v – video files
  • w – word-document
  • x – excel-file


C. the third part defines the type of sharing which is being used

  • s – the file being shared is only to be read, there is no distinction whether the file can be downloaded or not
  • r – restricted sharing with people which already have access to the file.

D. If the shared file resides in a specific site, the name of that site will be shown here. There is not difference made if the file library is in a site collection top level, or in a subsite

E. A 24-character anonymized reference to the file you want to share. If you shared the item with people who already have access, this is replaced with the path to the file (library/filename).

F. An internal character set to define further details regarding the sharing. If the item was shared to one specific user, the set contains less characters, but an extra parameter ‘email’ is added containing the mail-adress to which is was shared.

E. This parameter section is added by default behind each share-link.

  • d= xxxx – this will help creating a unique URL to allow opening the file in the browser. If you remove this parameter, you’ll get a download request. This parameter is only added when you share with People with existing access.
  • Csf=1 – added when sharing with People with existing access
  • Web=1 – opens the file in the browser
  • E= xxxx – The purpose of this parameter isn’t really known; if you remove it, the Share will work the same way.

The fun part is that in most cases the parameters can be removed from the url, and it will just keep on working 😊.

I hope this post was of value, if you would have any remarks or idea’s, just get in touch.

Share on facebook
Facebook
Share on twitter
Twitter
Share on linkedin
LinkedIn